
Blog | 9-minute Read
What is SCIM and how do I make the magic happen?

David Guest
Solution Architect & Technology Evangelist
Published: 22 May 2020
Relieve your user provisioning headaches by learning everything you need about a system for cross-domain identity management (SCIM).
The idea of identity and access management feels like it’s been around forever. The ability to create a user account in one system and then have matching accounts automatically created in additional systems the user needs access to.
As a concept, it’s a great idea. In practice, however, it’s not quite so simple – different systems have different connection methods (LDAP, SQL, ADSI, custom APIs, etc.).
What SCIM does is provide a standard method for linking your systems together to make managing identities in cloud-based applications and services much easier.
Let’s have a closer look at how SCIM came about – and learn how it can automate much of your user provisioning activity, so you’re free to focus on the bigger picture.
Why is SCIM important?
The automatic provisioning of accounts to different systems has always been something of a panacea for IT administrators.
Being able to create a single “master” account and have it added to other systems – using the same user information, ID and password – is an ideal.
With this in place, the administrators could focus on developing the IT infrastructure. Dealing with user requests to create accounts, reset passwords and other administration tasks would be handled automatically by the identity management (IDM) system.
When identity management was in its infancy in the late-90s (yes, it was that long ago), the links between different systems were handled by creating a connector that spoke directly from the core IDM service to each of the target systems. This became known as a hub and spoke arrangement.

Each of these connectors would then use a specific method for connecting to the system. LDAP could be used for directory services, SQL would be used for database servers, and other application programming interfaces (APIs) would be used to communicate to other services.
This meant that each application would require its own code to be written and managed. As new applications were added, the vendors might create an API to handle the communications, but you could guarantee it wouldn’t be the same as any of the other systems.
What‘s needed is a common standard that can be used to link all of these systems together. That’s where SCIM comes in.

latest edition
Everything you need to know about Microsoft Entra
A clear, practical view of how Microsoft Entra works as a unified platform.
Expert guidance on modern identity design, security, governance, and Entra licensing.
Discover how you can:
- Run Entra as one coherent identity platform
- Apply end-to-end security and governance
- Modernise IAM safely, from MIM to AI-driven identity
SCIM: A definition and brief history
SCIM is an acronym for “system for cross-domain identity management”. Although when it was first envisaged it stood for something else – “simple cloud identity management”.
The first version, SCIM 1.0, was released in 2011 by a SCIM standard working group organized under the Open Web Foundation. In 2011, it was transferred to the Internet Engineering Task Force (IETF), and the current standard, SCIM 2.0, was released as IETF RFC in 2015.
SCIM 2.0 was completed in September 2015 and is published as IETF RFCs 7643 and 7644. A use-case document is also available as RFC7642. If you’d like a little bit of light reading, these are all available from the IETF website.
The SCIM standard defines how the connection between the IDM system and the application/service operates.
So, how does SCIM work?
The different functions of SCIM can be split into sections relating to operations and discovery. In both of these cases, a REST call is made along with some parameters to identify what has to be done.
As an example, a REST call can be made to a service using SCIM: “What different resource types do you support?” or “What version of the specification do you support?”.
The discovery elements identify the attributes that are supported and the features available.
Once the discovery function is completed and the connection is understood, operations can be carried out to:
- GET
- POST
- PUT
- PATCH
- DELETE
These terms are well defined but not immediately understandable. They can be summarised in English as:
- GET = Retrieve
- POST = Create / Update records
- PUT = Update records
- PATCH = Update records
- DELETE = Delete records
As an example, you could then use these terms as follows:
- To complete a create request use POST
- To complete a read request use GET
- To complete a replace request use PUT
- To complete a delete request use DELETE
- To complete an update request use PATCH
- To complete a search use GET
- To perform a bulk upload use POST
Each of these can use parameters to define what needs to be done.
So, a request could be made to find all the users whose displayName equals “David Guest”. If the request was more generic and produced multiple results, these can be sorted by any available attribute by adding a sortorder to be ascending or descending.
JSON makes the magic happen
With IDM, most of the time we will be creating, updating or deleting users (or groups). This is done by posting a JSON with the relevant details in.
As an example, this could contain something like the following:
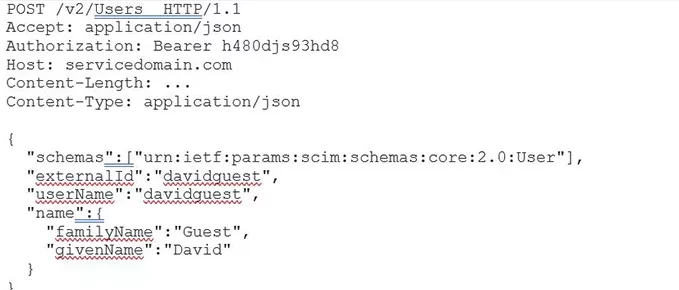
But just posting this out to the service is not enough. For a full IDM creation, there needs to be a response to confirm that the user has been created (or not). This comes in the form of another JSON:
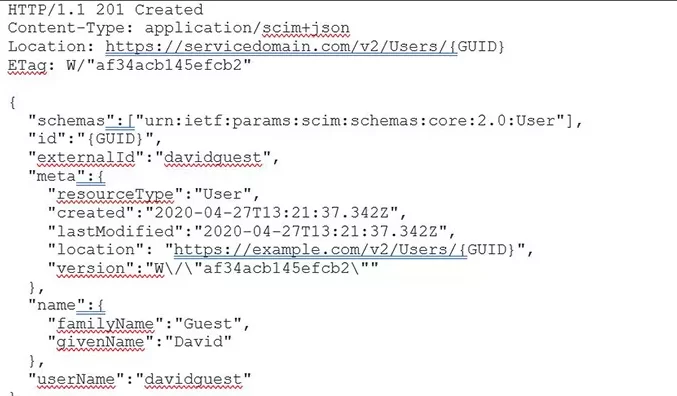
The code included in the first line of the response – 201 – indicates that the resource has been successfully created. Additional data is also added, this includes any metadata that can be stored in the IDM system to identify a correct match.
Each type of operation for reading, updating, replacing, and deleting would include a similar JSON and response.
Performing a bulk operation allows for a set of operations to be undertaken at once by passing the JSON as the body of the request containing multiple objects inside it.
A full set of response codes are included in the RFC documentation, but the major ones are as follows:
- 100 Continue
- 200 OK
- 201 Created
- 202 Accepted
- 203 Non-Authoritative Information
- 204 No Content
- 205 Reset Content
- 302 Found
- 304 Not Modified
- 400 Bad Request
- 401 Unauthorised
- 403 Forbidden
- 404 Not Found
- 405 Method Not Allowed
- 503 Service Unavailable
The facility to use SCIM to provision (and de-provision) users and groups against multiple services/applications is a huge step forward.
The ability to create these connections without having to configure a specific set of instructions for each service/application will improve the connectivity and allow for a more complete IDM system.
This will link together more systems with greater ease.
How do I deploy SCIM?
Deploying an identity management system to provision accounts using SCIM should be relatively easy.
Step 1. Check your identity system and target service/application support SCIM
This should not be too difficult. Systems that support SCIM tend to have good documentation and a quick internet search will tell you whether the system supports it or not.
Azure AD as an identity platform supports SCIM, as do systems like AWS, Google, Facebook (at work) and many others.
Step 2. Define the connection between the systems
Here, you effectively tell the identity store where to send the information by providing the details of the SCIM interface at the application level.
Often this appears as a URL that can be typed in. You will also need to tell the application that it is going to be receiving information from an identity source and how that’s going to access the application.
Authentication details are also required – we don’t want just anyone who knows about SCIM to be able to create accounts in your systems.
Step 3. Define what the content of the connection will be
What types of objects are going to flow across – is it simply users and groups or more complex?
You also need to define what information about the objects will be sent over: Name, User ID, Shoe Size etc. (okay, maybe not shoe size…).
Step 4. Make sure to include the relevant users who you want to pass across
You may well be wanting to send all your users across, but it’s more likely to be a subset of your users – perhaps select a single set of users who belong to a group.
Step 5. Test the connection and let it provision the initial users
Select a small group of users for an initial test to make sure that these are created correctly and can sign in (using single sign-on of course).
Step 6. Expand to your whole population
Once you’re happy everything is working as it should, then expand the members to include your complete user population.
Step 7. Sit back and relax
Configuring SCIM in Azure AD
SCIM has been supported within Azure AD since 2016 and is increasingly being used to provision accounts and groups to multiple systems including Amazon Web Services.
Inside Azure AD, this is configured as part of the enterprise application management. A degree of configuration is required, starting with an authentication set:
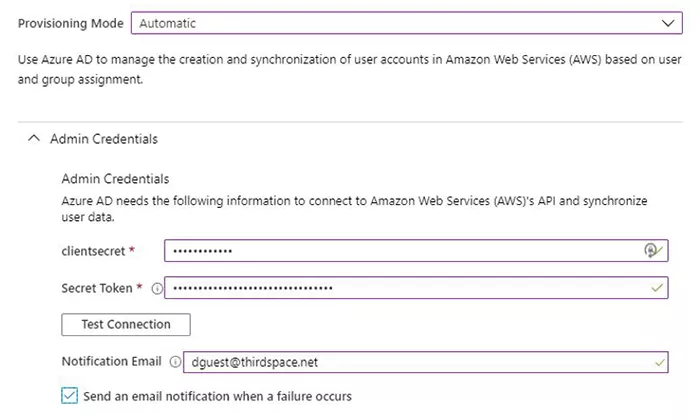
A configuration for the attributes to be delivered is also required.

This is needed for both users and groups.
Once in place, it can be left to run the provisioning. A summary of the current state is visible in the relevant blade:
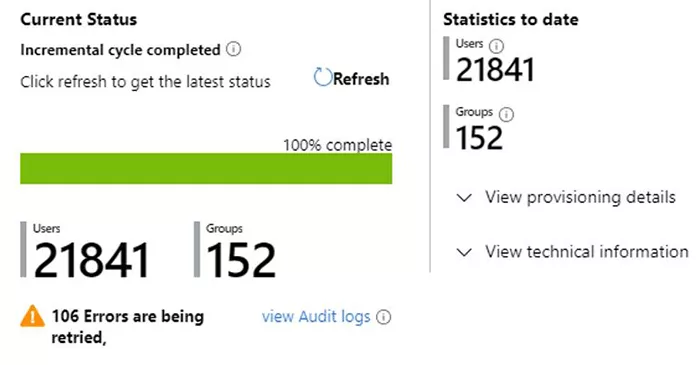
Any errors should be resolved as part of the deployment cycle.
Some considerations before you start
Before embarking on the journey to a full SCIM setup, there are a few questions you should ask yourself and others.
Firstly, you need to ensure that any new applications/services that you are planning to bring into your organisation support SCIM.
Maybe add this to a list of pre-requisites in any RFI/RFP so you can evaluate responses and make sure that they are compatible before proceeding.
Secondly, look at your existing applications/services and ask the question of the vendor. In some cases, you will already have an automatic provisioning system in place (it may not be SCIM, but it is working). Leave changing these applications and services until later and concentrate on the systems where manual provisioning is the only method available to you.
Then look into how you can use SCIM to replace these manual processes and what information you’ll need to provide.
Lastly, configure, test, and deploy SCIM to remove the headaches of provisioning to your different systems and applications.
Of course, the last three of these steps can all be handled by a partner who specialises in identity and the user lifecycle. Kocho are perfectly suited to aid you in this regard.
Conclusion
If your external applications/services support SCIM and are not currently having users provisioned automatically then now is the time to switch over.
Using SCIM to provision, update and de-provision users and groups will remove that workload from the current administrators.
The SCIM configuration can be complex but when configured correctly and combined with single sign-on will provide a seamless experience for your users.
Free Guide
Everything you need to know about Microsoft Entra
The most comprehensive guide to Microsoft Entra. Over 40 pages. Plus, Microsoft licensing simplified.
Discover how you can:
- Cut costs by removing 50% management effort
- Elevate security – reduce breach chances by 45%
- Automate provisioning to ensure compliance
Key takeaways
SCIM provides a standard method to link your systems together.
It makes managing identities in cloud-based apps and services much easier.
SCIM frees your IT team from repetitive user requests that can now be automated.
SCIM is relatively easy to deploy in most cases and operates well within Azure AD.
Great emails start here
Sign up for free resources and exclusive invites
Subscribe to the Kocho mailing list if you want:
- Demos of the latest Microsoft tech
- Invites to exclusive events and webinars
- Resources that make your job easier


Don't Miss
Great identity resources


